Atlas · User Manual
Customer Management
Find companies and contacts, create customer records and classify them consistently.
Last edited:
Find the customer and inspect the evidence
Choose a task first. Use an account with access to that feature in the active organisation; each linked procedure lists its prerequisites.
- Find or create a customer manually
- Prepare a customer from notes or a file
- Import a spreadsheet
- Read the customer profile
- Check communications and notes
Check the result: You can open the intended customer and compare profile information with linked records and sources.
If you get stuck: If search is empty, check the organisation, spelling and filters. An empty list only describes records visible to you. Review duplicate matches before creating or importing a customer.
Find and create customers
Screen: /customers
Use case: Create a customer once, then build its record progressively.
Before you begin: Use an account with access to this feature in the correct organisation.
How to do it
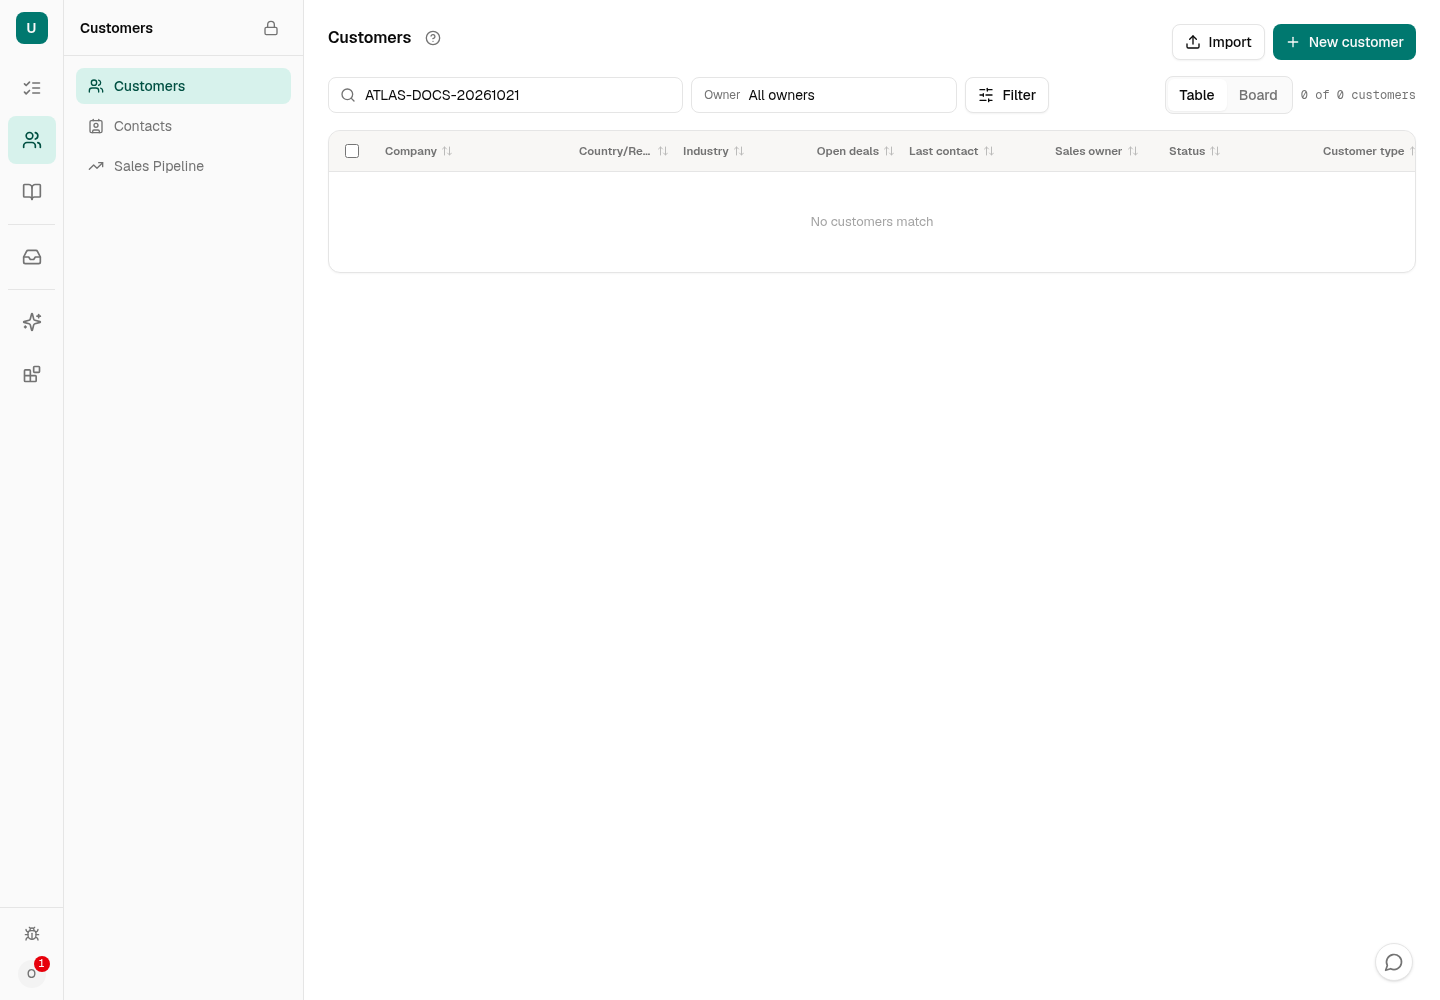
- Open Customers → Customers. Search by company or contact and check the Owner and Filter controls before adding a record. The list includes records visible in the current organisation; Owner → Public shows the claimable pool.
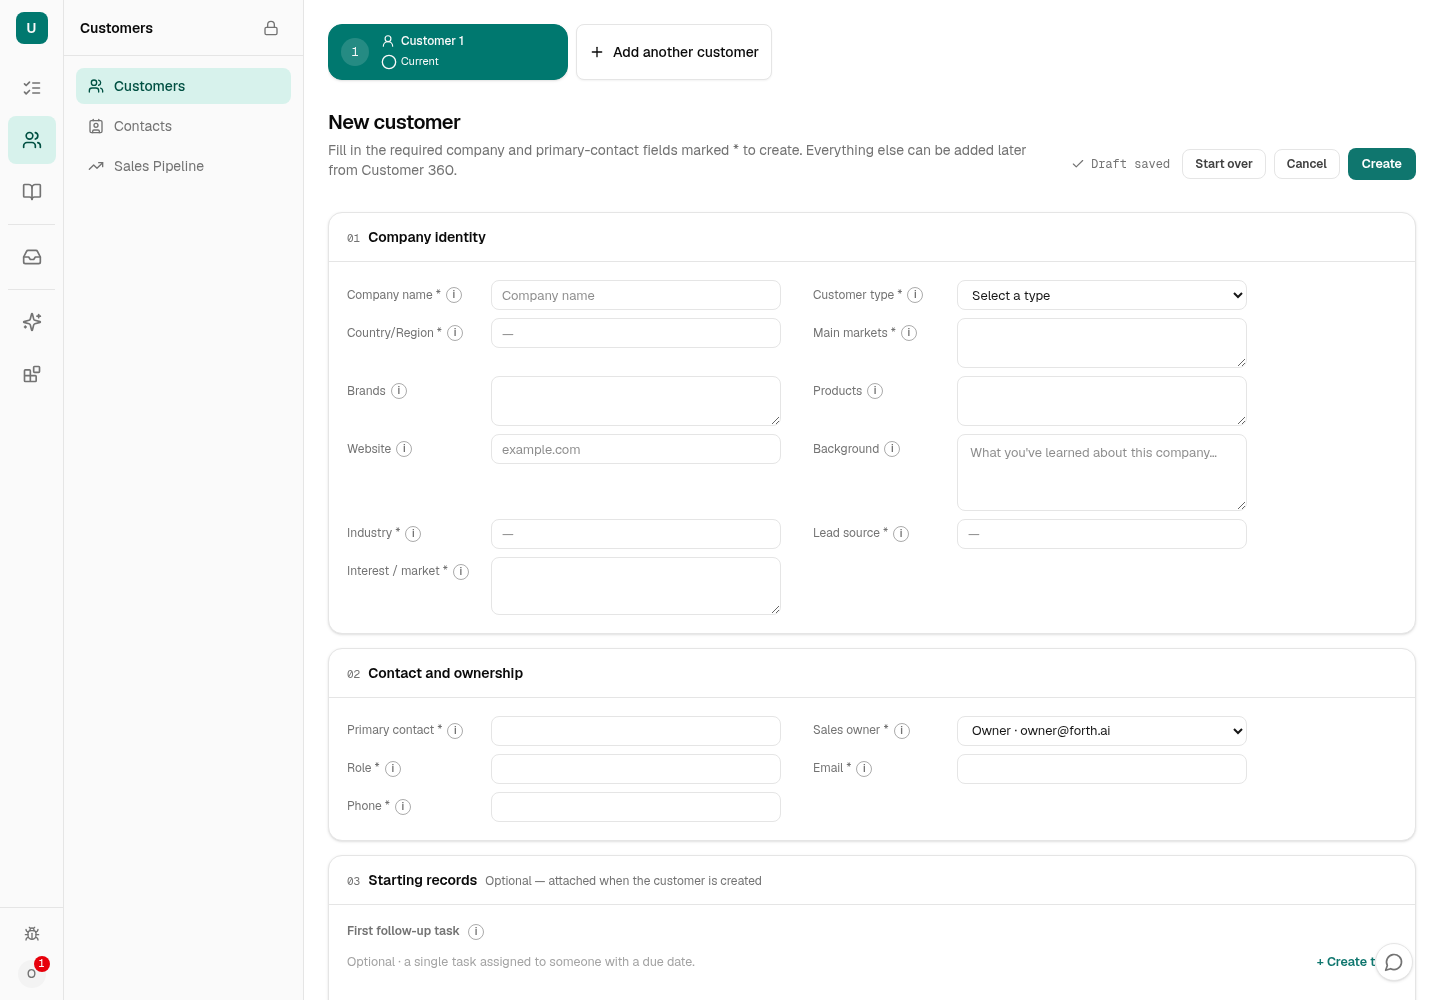
- Choose New customer. Enter the company name and choose its customer type. For a full customer record, complete Country/Region, Main markets, Industry, Lead source, Interest/market and Sales owner. If you choose Other for Industry or Lead source, enter its custom label. A required organisation custom field must also be filled. Website, background, brands and products can be added when known.
- Add one primary contact with name, title, phone and email. Additional contacts require a name; their other fields are optional. If the company is only a lead whose details are unknown, choose the Prospect customer type: only the company name is required, though any entered value must still be valid. Complete the profile and contact later.
- Optionally add a deal, follow-up task, communication, document or note. A started deal needs a title and stage; a next action needs both text and due date. A started task needs a title; a communication needs summary and date. Check each item's customer, owner and deal association before saving. Add another customer starts a separate draft.
- Review the progress checklist and choose Create. If a Possible existing customer panel appears, inspect the match. Open existing customer, add these notes to it, or Keep editing; choose Create anyway only when a separate company record is intended.
- Open the created customer and check its contact and linked items. The core record can save while a later item fails. Use Retry remaining steps for failed additions; do not create the core customer again. If Create is refused, correct the field beside the error and submit the same draft.
Expected result: The new profile appears in the accessible customer list with the intended owner and any contact you supplied; each optional linked item shows its own result.
The older list screenshot below documents its dated screen. Creation requirements and failure handling above were checked against the live production source (web 3d1fbb9); no record was submitted for this update. Bulk deletion is destructive: review its scope before confirming.


Create a customer from notes or a file
Screen: /assistant, then the New customer form
Use case: Turn a business card, company notes or a supported file into a draft you can verify.
Before you begin: Use an account allowed to use the Assistant and create customers in the current organisation. Reading or preparing source material may use paid AI processing.
How to do it
- Open AI Assistant → New chat and choose Create a customer from notes, or describe the company in the composer. Attach the relevant file with Attach a file when needed; wait for its upload and reading result. A file merely uploaded to My Docs has not created a customer, and an unreadable large original cannot supply extracted facts.
- Read the Assistant's proposal and its source excerpt. Resolve any possible existing customer match and review uncertain or missing fields; a suggested value is not a confirmed fact. Open the prepared customer draft and correct the core profile, primary contact, owner and optional linked items.
- Choose Create in the customer form only after checking the destination and associations. If the draft contains a document-derived review, complete its required choices first. Return to the conversation or its history to resume an unfinished proposal; do not start another create just because the form was closed.
- After saving, open the created profile. For failed linked additions, use Retry remaining steps on the existing result. For a duplicate refusal, inspect the match and choose the existing record or deliberately create separately.
Expected result: The Assistant prepares a reviewable draft; the customer and its linked records exist only after the creation action succeeds.
The proposal and review flow are source-confirmed on production web 3d1fbb9. This update did not run paid AI or submit a customer, and has no new screenshot of the proposal.
Next: Prepare an attachment · Check file readiness · Complete the customer form.
Create from an inbox conversation
Screen: /inbox
Use case: Keep a real email thread with the correct customer, creating a company record only when no existing match fits.
Before you begin: Use an account with access to the connected inbox and CRM in the current organisation. Check the sender and the suggested match before saving.
How to do it in production
- Open the conversation and choose Link to customer. Review the proposed customer match, or search for an existing customer. Select New customer only when the thread belongs to a new company.
- For a new company, enter its name and any known country and sender contact details. Save the customer link. This inbox shortcut accepts a smaller set of fields than the full New customer form; open the customer profile afterward to complete classification, ownership and contact details.
- The production flow then offers a separate deal step. Add or select a deal if the thread concerns one, or skip that step. Check that the conversation displays the confirmed customer and, if chosen, deal link.
If saving stops partway: If the customer was created but linking failed, read the error and retry the link within the same open flow. Search the customer list before starting over so you do not make a duplicate. A suggested link is not a confirmed association.
Expected result: The thread has a confirmed customer link; creating or linking a deal requires its own production step.
Staging web ef39dda8b presents a newer single form with a customer picker, optional deal and one final save. That staging interaction is not the live production procedure above. Neither environment was used to save an inbox link for this update.
Desktop app: In the Atlas desktop app's Inbox, an open conversation lists its attachments and shows the linked customer, contact and deal together with who linked the conversation and when. To correct an association, use Change link — search the customer, optionally pick that customer's deal, and confirm — or Remove link, which asks for confirmation and then shows the conversation as unlinked. Only customers and deals your account can already access are offered or displayed; a linked record you cannot read shows as unavailable instead of its details.
Related: Read customer communications · Complete the customer profile · Set up email.
Import spreadsheets and resolve duplicates
Screen: /customers
Use case: Review a batch before creating or updating customer records.
Before you begin: Use an account with access to this feature in the correct organisation.
How to do it
- On Customers → Customers, choose Import and Download template, or select your CSV, TSV, XLSX or legacy XLS. Maximum 2 MiB and 1,000 rows; only the first worksheet is read and formulas are not executed.
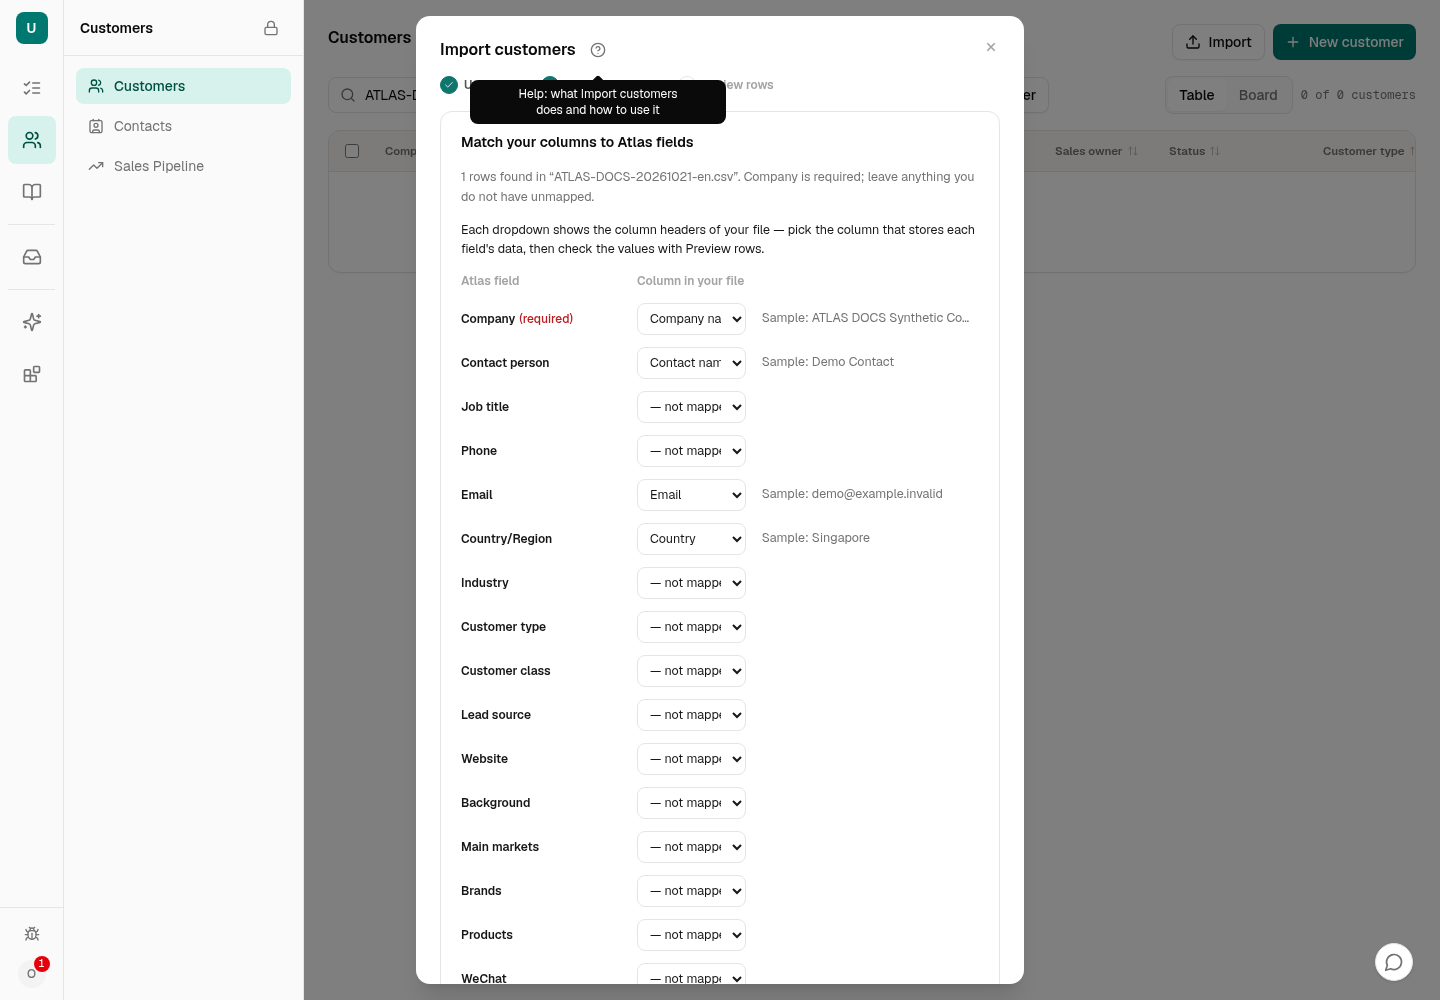
- Map Company (required), contact name, job title, phone, email, Country/Region, industry and customer classification columns. The template uses the Country/Region header; existing files with a Country header still map automatically. Preview the rows.
- Resolve New, Possible update, Duplicate and Needs fixing rows. Choose Create new, Update existing, Leave for now or Skip as appropriate; inspect company/email matching.
- Commit only reviewed rows. Rows marked Skip or Leave for now remain untouched. A preview expires one hour after upload. For an expired preview or changed file, re-preview and re-review.
- Inspect each row result. Before retrying a failed row, search for a customer it may already have created; a later classification or persistence failure does not undo that creation. Correct an existing record when present; otherwise retry within the same preview. Successful rows stay saved; do not import the same batch again merely because some rows failed.
Expected result: Each committed row has a reviewed destination and a visible result.
Upload/mapping/commit procedures were checked in deployed source; the upload dialog was inspected without uploading customer data.
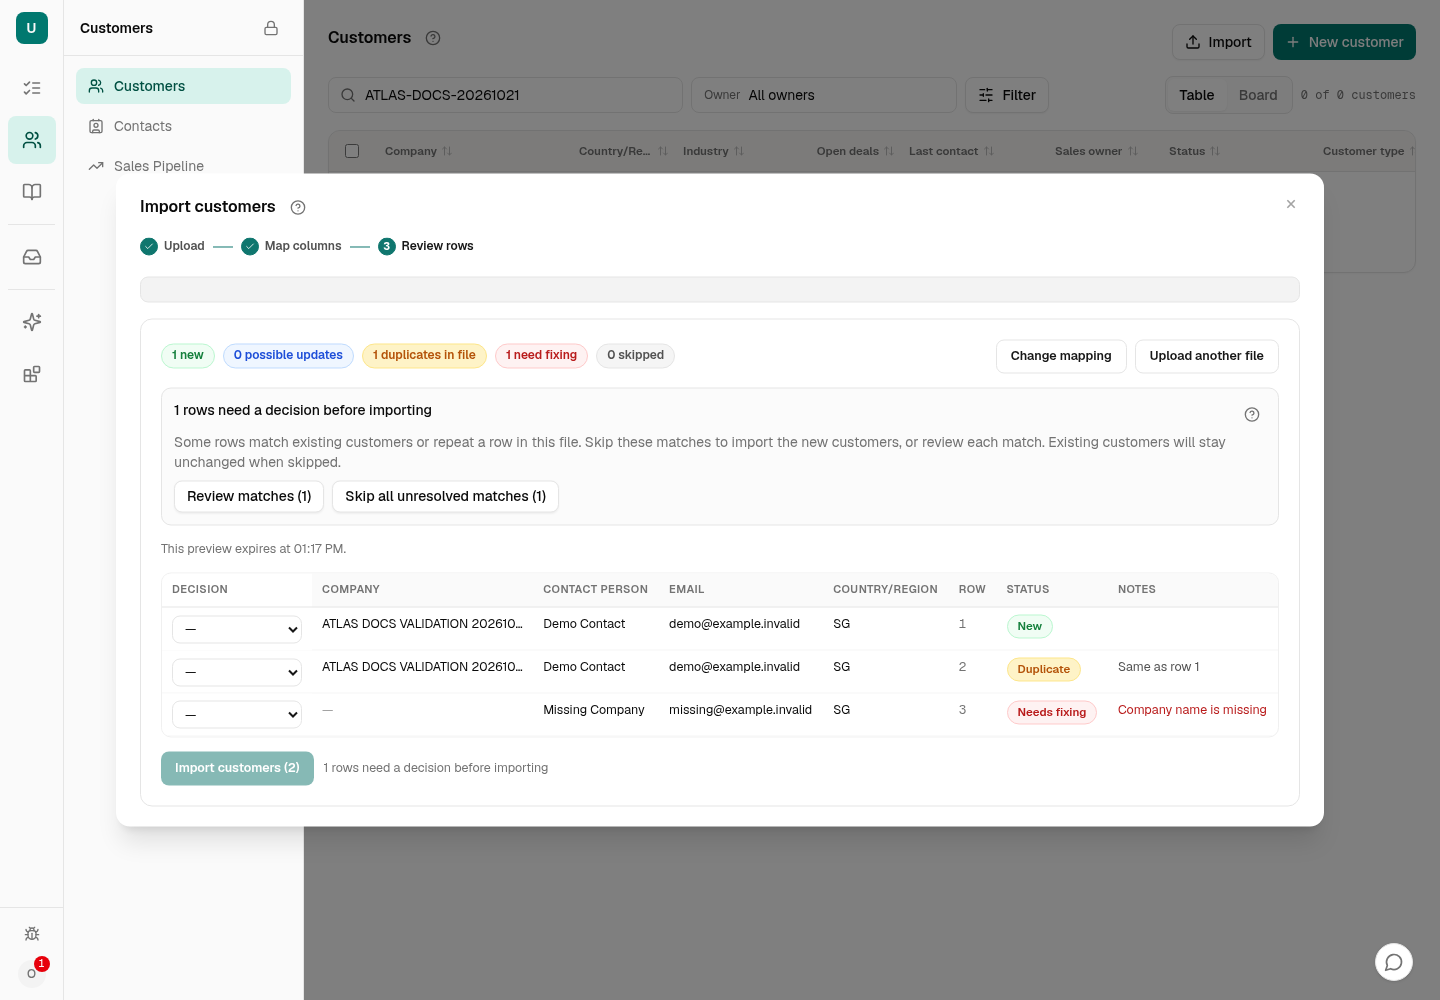
Resolve matches quickly: The preview shows how many rows need a decision. Choose Review matches to see only those rows, or Skip all unresolved matches to leave existing customers unchanged and import the new customers. This saves skip choices only; choose Import customers separately to import. Use Show all rows to change any choice. Individual decisions stay visible while scrolling across the table.
What do these choices mean?
Choose the ? icon at the right of the match summary to open this explanation. Close the dialog or press Escape to return to the review.
Possible update counts rows matched by company name or email, not changed fields. Matching does not compare every field. New, possible update and within-file duplicate counts describe the preview classification; your choice controls what is saved.
- Create new
- Create a separate customer record from this row. The matched customer stays unchanged.
- Update existing
- Write this row’s supplied fields to the matched customer; these values can replace existing values. Blank cells leave existing values unchanged.
- Leave for now
- Do not import this row now. No automatic merge or follow-up is scheduled; you must handle it yourself later.
- Skip
- Ignore this row for this import. Nothing is created or updated. Choose this for identical data or any row you do not want to import; the system has not confirmed that every field is identical.
Choose and check the mapping
| Information | What the import can save |
|---|---|
| Company | Company name is the required mapped field. Import does not require every field in the full manual creation form; complete missing facts in the profile afterward. |
| Contact | Name, job title, phone, email and supported social accounts populate primary-contact information. This is not a batch import of several contacts per company. |
| Profile | Country/Region, industry, customer type/class, lead source, website, background, main markets, brands and products. Review unrecognised classification values and unmapped columns before committing. |
| Ownership and associations | There is no owner, deal, task or document mapping. New customers belong to the importing user; updating a match keeps its existing owner. Add or assign related work from the saved customer afterward. |
Access and recovery: A preview belongs to its uploader and organisation. Updating a match still needs current access at commit time; a reassigned or no-longer-accessible customer can fail even after a valid preview. Check the row reason and ask an authorised owner/manager to resolve access. Do not change the choice to Create new simply to work around a refused update. Reusing the same preview skips rows already recorded as created or updated. A failed row can still have created a customer before a later classification or persistence step failed: search for that customer before retrying, and complete or correct the existing record if it is present. Starting a new upload creates a new preview and does not retain the earlier row outcomes.
Check preview classifications before deciding
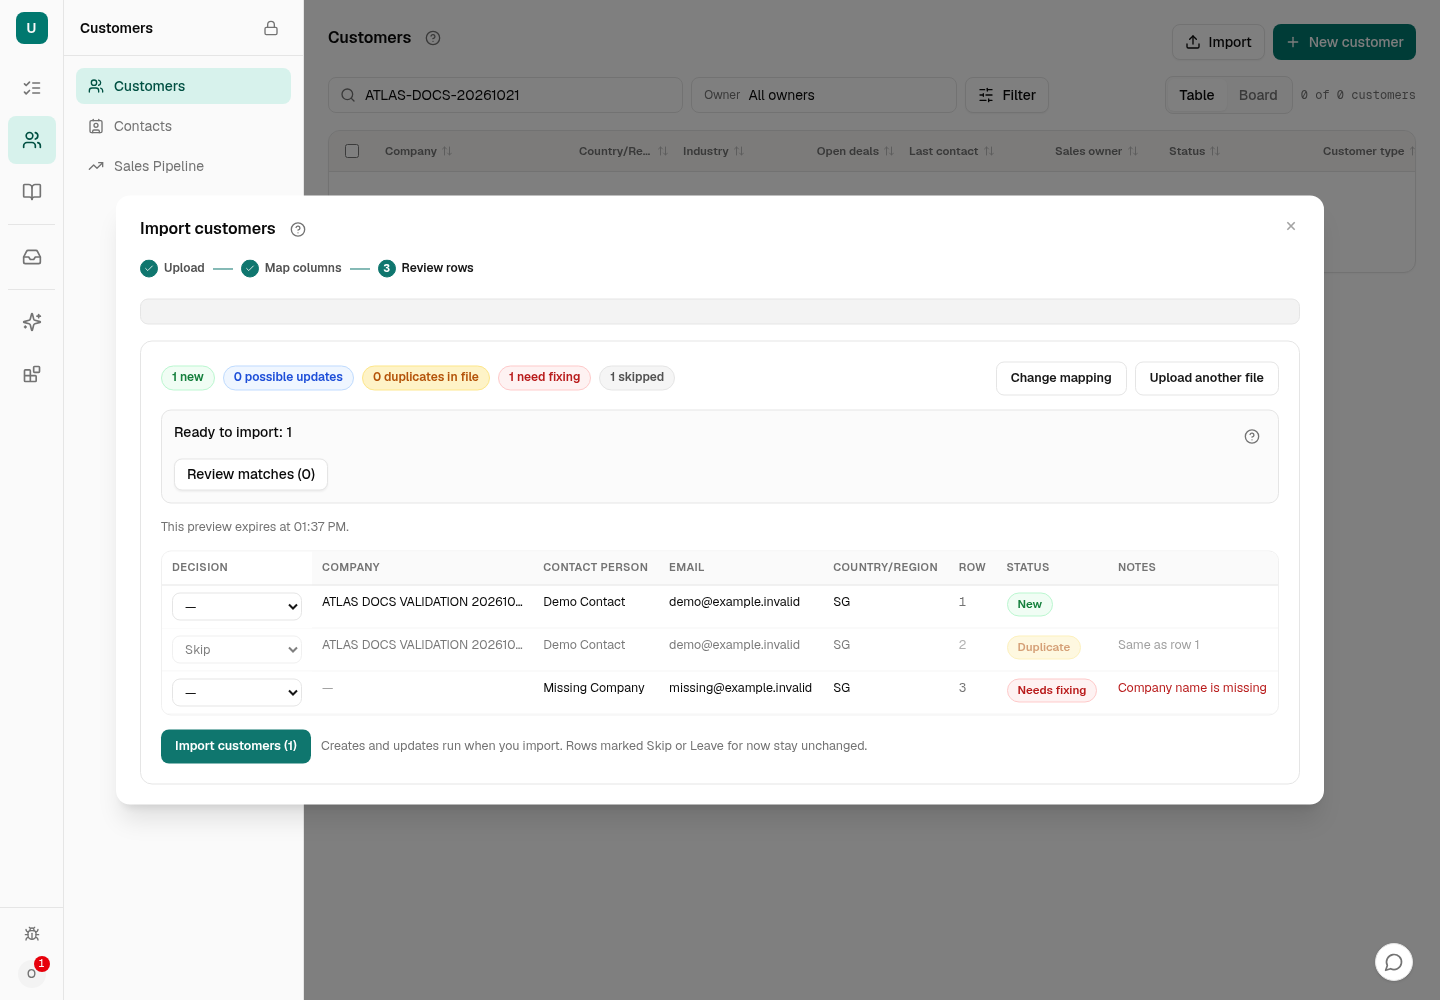
The three synthetic CSV rows below show New, Duplicate in file and Needs fixing because a company name is missing. Check each row’s fields and explanation; correct missing values in the source file, then upload and preview again. A duplicate classification does not mean customers were merged. Decision controls are visible, but this walkthrough made no decision updates and did not commit the import. Importing remains a separate consequential choice; this image does not demonstrate final results.
Skip only the matches awaiting a decision
- Use Review matches to show rows still awaiting a decision. Skip all unresolved matches skips those pending matches, not every row in the file.
- Alternatively, choose Skip in a duplicate row’s Decision control and wait for the refreshed preview. Below, row 2 is skipped: the summary shows one skipped and zero unresolved matches. Row 3 still needs its missing company name fixed.
- Ready to import: 1 describes the preview, not a created customer. Creates and updates run only after submitting Import customers; this walkthrough did not submit it.
- To keep every customer unchanged, close without importing. Previews expire; after expiry, upload and review again instead of assuming the earlier choices carry into a new preview.
Customer profile and classification
Screen: /customers/:id
Use case: Maintain accurate company facts, ownership and confirmed preferences.
Before you begin: Use an account with access to this feature in the correct organisation. Confirming or rejecting a fact needs an authorised editor.
How to do it
- Open a customer row. The header shows its classification and stage (for example "Lead · Not assessed yet") beside + Label and Edit; use Edit for the profile fields and + Label to add or change tags.
- Check the Ownership block: State (Owned or Public), Owner and Move to Public, which releases the customer back to the pool.
- Read the five tiles (Open deals, Pipeline, Total sales, Outstanding and Last Contact), then use the tab strip to open a record type: Customer overview, Historical transactions, Deals, Current quotations, Communications, Contacts, Documents, Notes.
- On Customer overview, review Confirmed facts first, then the suggestions strip ("N to review", Actionable, and a count of facts still needed to reach the Enriched profile tier), then engagement context (open deals and follow-up tasks), and only then AI customer insights (health score, risk factors, recommended next step and the engagement plan).
- For a communication preference, check the evidence shown for the fact, then either confirm the Email or Phone option under Record preference or use Reject to remove one you do not want. Existing evidence for a rejected or conflicting fact stays visible rather than disappearing.
Expected result: Profile facts, ownership and confirmed preferences match the intended customer, and rejected or conflicting facts remain visible for review instead of being hidden.
Read-only walk: no fact was confirmed or rejected and no label was changed. Sales users normally see owned customers; effective permissions and organisation context constrain visibility.

Contacts, communications, documents and notes
MB and GB use binary units here. Exactly 50 MiB keeps existing automatic behavior and reader limits. Large nonvideo originals stay available even when processing is unavailable: PDF readers allow 25 MiB, image readers 8 MiB, Office/XLSX readers 32 MiB, and customer proposal reading 10 MiB. There is no enabled Process action for unsupported large files. Library storage remains limited to 2 GiB per organisation; existing permissions and billing rules apply.
Screen: /customers/:id
Use case: Keep the relationship history attached to the customer.
Before you begin: Use an account with access to this feature in the correct organisation.
How to do it
- Open the customer's tab strip (Customer overview, Historical transactions, Deals, Current quotations, Communications, Contacts, Documents, Notes) and choose the appropriate tab. Add a contact or follow-up task with the intended owner; link a deal when the activity concerns a specific deal.
- In Communications record the actual Call, Meeting, Message or Note, or use the contextual email/meeting form. Check direction, date and participants.
- In Documents select a supported file, add its purpose or deal if offered, and wait for the upload result. Supported customer originals can be up to 1 GB (1 GiB; 1,073,741,824 bytes), inclusive. Files larger than 50 MB (50 MiB; 52,428,800 bytes) stay uploaded without automatic reading; enter their customer and deal details yourself.
- Add a note with the relevant facts. Open saved items to verify links; use edit/delete only for the intended item and read any confirmation.
Expected result: Relationship evidence is linked to the correct customer and deal.
Earlier read-only study: procedures beyond opening profile navigation were source-confirmed; that study created no production records or files. The 25 October synthetic communication example below came from a separate test.
Only qualifying communications reset the contact clock used by automatic recycling. Notes, uploaded documents and system/audit history do not count as customer contact.
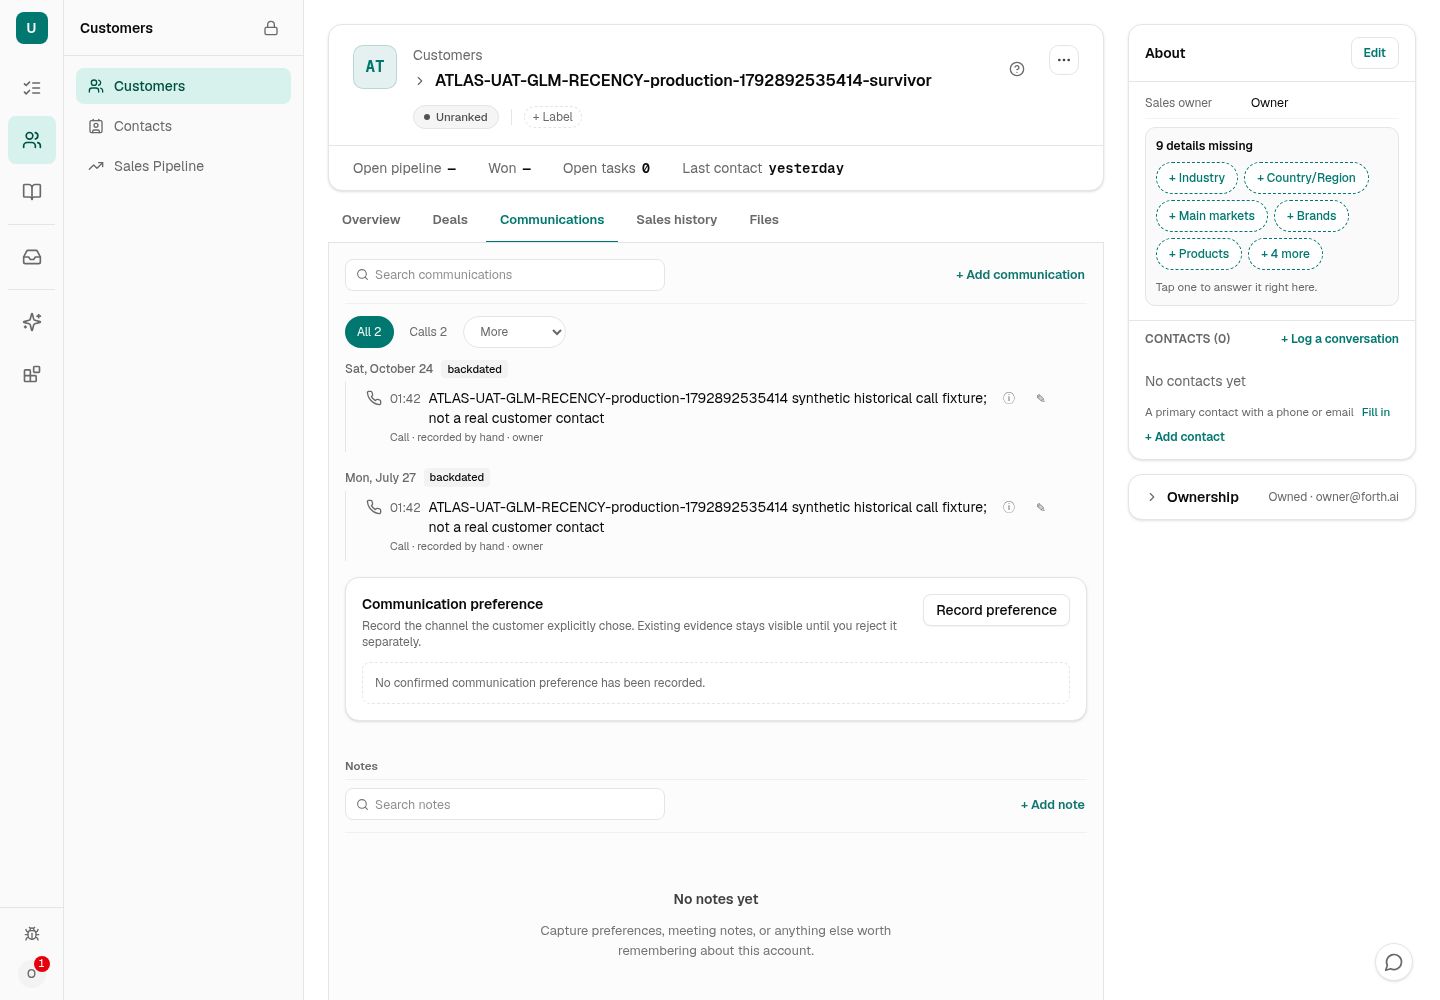
- Check Last contact.
- Call records show their backdated dates.
- Notes are separate and do not count as contact.
Record historical transactions
Screen: /customers/:id
Use case: Maintain sales history without confusing it with taking payment.
Before you begin: Use an account with access to this feature in the correct organisation.
How to do it
- Open the customer's Historical transactions tab and search existing entries first.
- Choose Add transaction. Enter date, amount, currency, Paid/Outstanding/Cancelled status, reference and optional deal and note.
- Save and verify the record plus the count, total and outstanding summary. Interpret totals with their currency.
- Open a row to inspect or Edit. Delete is irreversible; confirm only after verifying the exact record.
Expected result: Historical sales records are correct; no money is moved by recording a transaction.
Source-confirmed procedure. The list fetch is capped at 500 records; a limited list should not be treated as an unlimited accounting export.
Manage contacts and primary contacts
Screen: /contacts
Use case: Maintain a person's details under the correct company and keep one reachable primary contact per customer.
Before you begin: Use an account with access to this feature in the correct organisation.
How to do it
- Open Customers → Contacts. Search a name or filter by customer; the list shows Name, Customer, Title, Email and Phone, with a Primary tag on each customer's primary contact.
- Choose New contact and select the customer before entering name, job title, phone and email. Optionally upload an avatar (JPG/PNG/WebP, up to 5 MiB) and add up to six social accounts with platform and handle (up to 120 characters each).
- Select Make primary only when this should be the company's primary contact. Review duplicate-email warnings; use Save anyway only after confirming the duplicate is intentional.
- A customer with no contact marked primary, or whose primary contact has no email or phone on file, is what the "Missing primary contact channel" decision cards on the Workbench are about: that follow-up work stays blocked until a primary contact with a usable channel is confirmed.
- Open the saved contact to edit details/notes or replace/remove the avatar. Before deleting a primary contact, promote another contact; then review the delete confirmation.
Expected result: Each person belongs to one customer, one primary contact per customer is set with a reachable channel, and no follow-up sits blocked by a missing contact channel.
The contacts list was read and the blank contact form was inspected; no contact was created, edited or deleted. Social options include WeChat, WhatsApp, LinkedIn, Facebook, Instagram and Other.

Public customers: release, claim and assign
Screen: /customers?owner=public
Your first result: Find a customer in Public, claim it and check that you are its owner.
Before you begin: Use an active membership in the correct organisation. Every role can browse and claim Public customers. You do not need to change the organisation's recycling policy.
Find and claim a customer
- Open Customers → Customers. Beside search, choose Owner → Public. Public means the customer is available for a new owner in this organisation.
- Search for the customer. Check its name, previous owner, Public since date and reason before claiming it. Use the page controls if needed. Other directory filters do not apply to Public and are cleared with an explanation.
- Choose Claim. When it succeeds, the customer's detail opens. Expand Ownership and check that you are the owner. The customer has left Public.
Expected result: You own the customer and can continue from its detail page. If someone else claimed or assigned it first, read the conflict message and use the refreshed list. Do not assume a failed claim changed ownership.
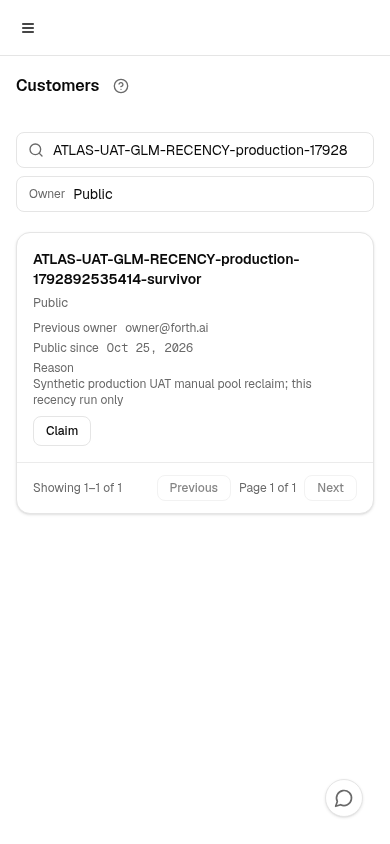
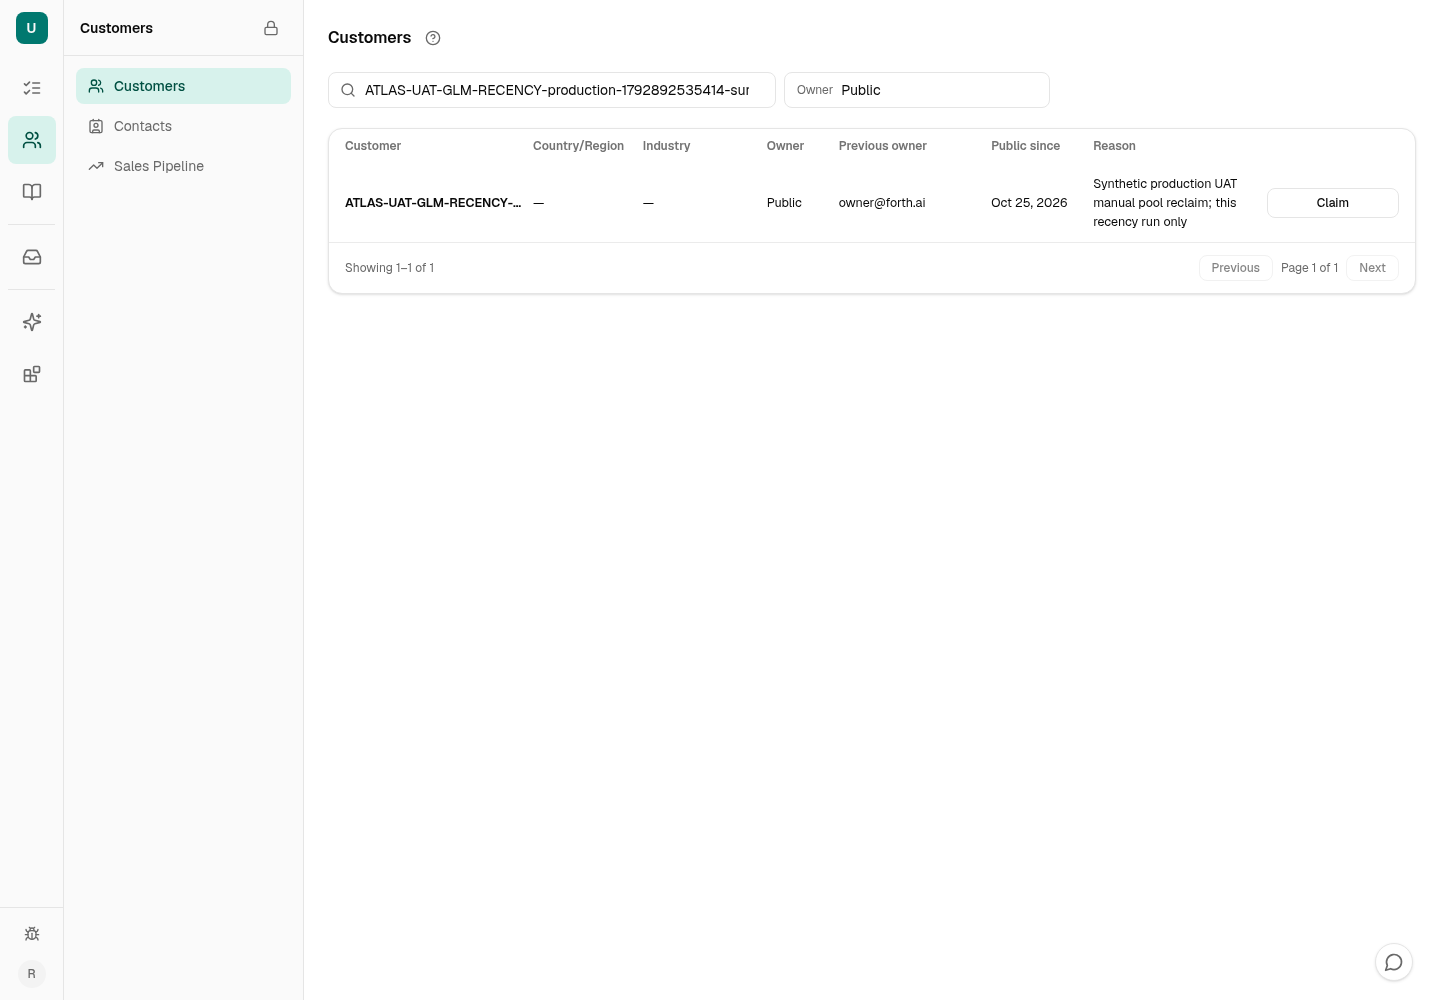
- Search for the intended customer.
- Check that Owner is Public.
- Review the record, then choose Claim.
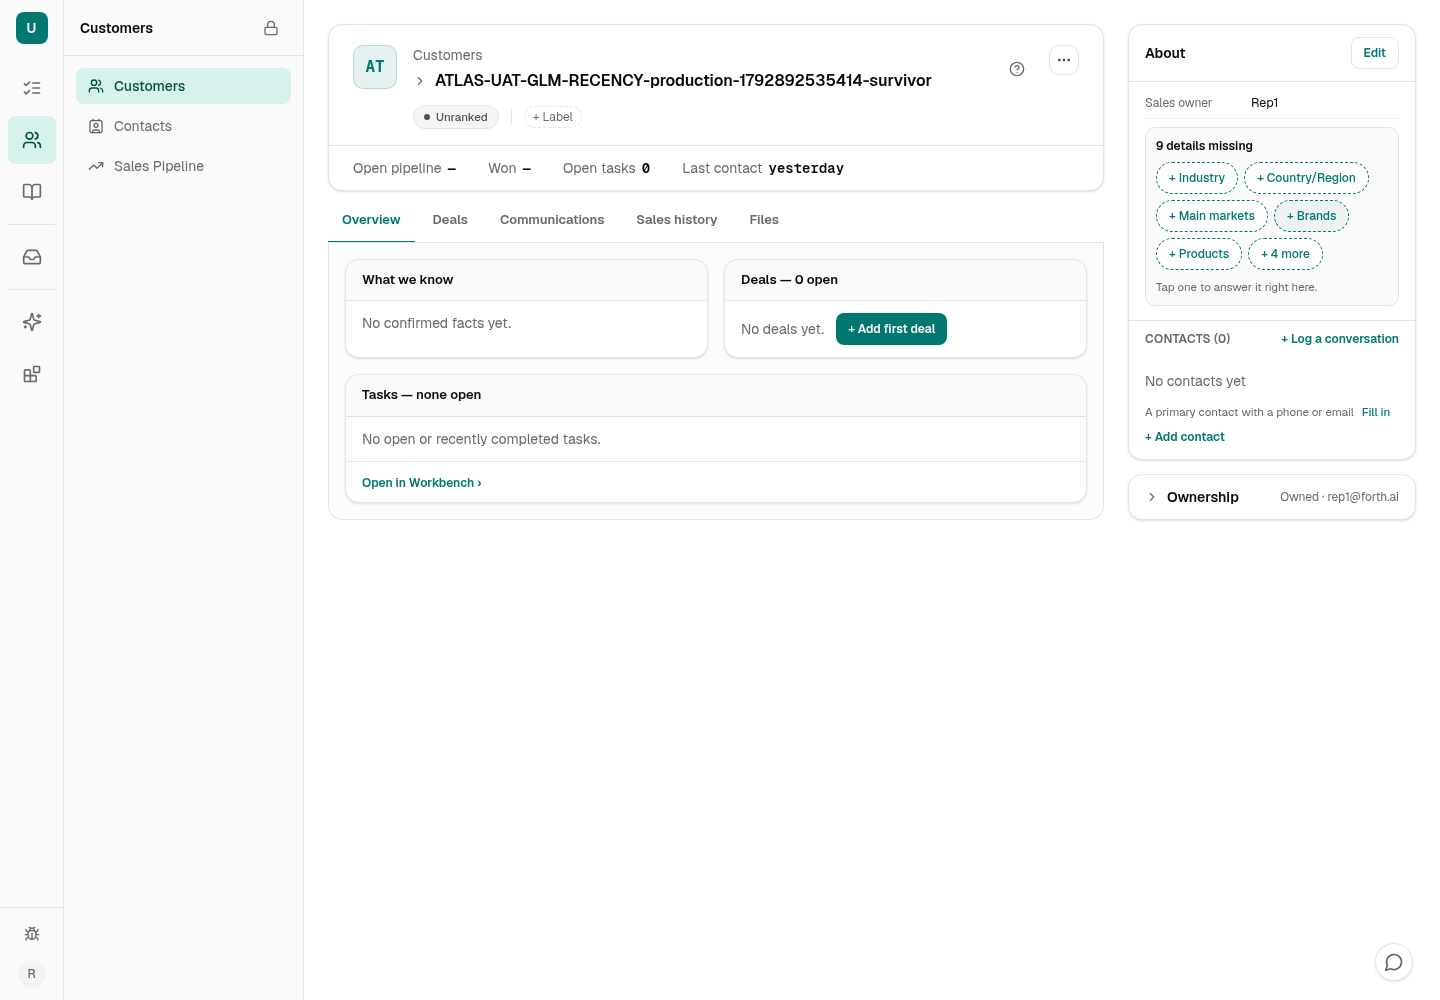
- Check the new owner in About or Ownership.
Move a customer to Public deliberately
The current owner, a manager or an admin can open the customer's detail, expand Ownership and choose Move to Public. Before confirming, check that the team should take over: you may lose access until the customer is claimed again. Enter a reason of 5–500 characters, review the confirmation and choose Release customer. Its history is retained; related work keeps its own owner. This manual move does not wait for automatic recycling.
Managers and admins can use Assign owner to choose an active organisation member. Claim takes a Public customer for yourself; assignment chooses the next owner.
The old /customers/pool link redirects to Owner → Public and preserves search and page. To understand automatic moves, continue to recycling rules and warnings.
Customer pool recycling: settings, protection and warnings
Screens: /settings/sales-crm?tab=pool, customer detail, /today
Use case: Understand when a customer can move to Public automatically, and what to do before that happens.
Before you begin: Only an organisation administrator can configure the policy. Managers and admins can protect a customer or remove protection. Warnings go to the current owner when still an active member, plus active managers and admins.
Read a warning and follow up
The notification bell shows the customer, the warning deadline and a link to the record. Open the customer and check its communications before deciding to follow up, ask a manager for protection or move it to Public deliberately. Reading the bell does not start or complete the warning period.
Understand the timing
Example, not a promised release date: with 60 days without contact and a seven-day warning window, a customer whose other grace periods have already ended becomes warning-eligible on day 60. If all required warning deliveries are acknowledged then, it can move to Public no earlier than day 67. The warning does not begin on day 53 in this example.
The full seven days run from the system's acknowledgement that warnings were delivered to all required recipients. This is delivery acknowledgement by the Tasks service, not a person's read receipt or a completed follow-up task. Slow delivery postpones release; it never shortens the warning period. Scheduled processing and the remaining checks can make the actual move later.
- Recent communication: a qualifying call, meeting, message or supported email/SMS communication postpones recycling. For a never-contacted customer, creation time is the starting point. Notes, file uploads and audit entries do not count as contact. See communications and records.
- Assignment and activation grace: the assignment grace starts from the later of the last assignment and policy activation. Activation also has a safety grace of at least the warning window. A later grace deadline can delay warning or release, and a full delivered-warning period is still required.
- Protection: active recycling protection blocks automatic release. A manager or admin can expand Ownership → Recycling protection, choose Protect from recycling, enter a future date within 365 days and a reason of 5–500 characters, then confirm. Protection and removal are recorded on the timeline.
- Open work: an opportunity or quotation alone does not exclude a customer from recycling. Check with a manager if the customer needs protection. Only active, assigned customers qualify; customers already inactive or in Public do not enter this automatic candidate set.
For administrators: preview before activation
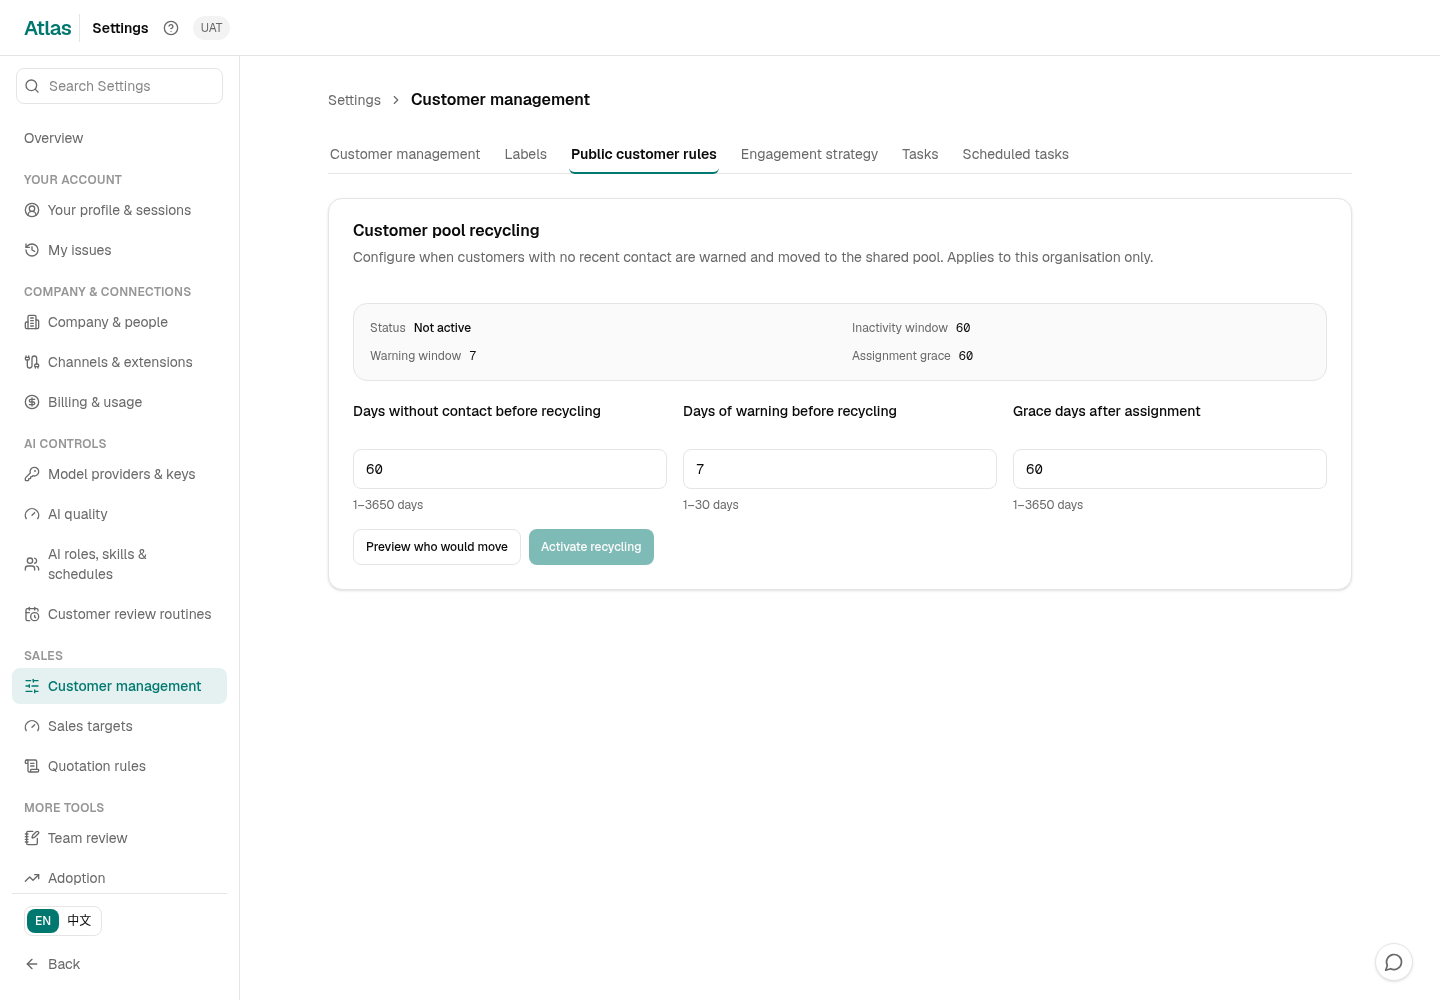
- Check that Status is Not active.
- Read all three timing windows.
- Preview before deciding to activate.
- Open Settings → Customer management → Public customer rules. The Public view's Public customer rules control also leads to the rules; other roles receive an explanation. Check whether recycling is active and read the inactivity, warning and assignment-grace windows.
- Adjust the windows and choose Preview who would move. Review qualifying customers, protection/recent-contact exclusions, pending grace and warnings, and the earliest projected release. Preview does not move customers. A projection is not a guarantee of release at that time.
- Activate recycling only when the organisation intends these automatic moves, then confirm. Disable recycling stops future automatic moves; customers already in Public remain there. If the policy changed while you edited it, review the refreshed values before trying again.
Expected result: The policy remains off until activated. Automatic release requires all timing, delivery and protection checks to pass; ownership changes remain recorded. A manual release-and-claim walkthrough demonstrates those actions, not the passage of a natural 67-day recycling cycle.
Customer labels: a step-by-step guide
Open Settings → Organisation → Labels. To label one customer, open that customer's profile.
Use case: Organise your own follow-up work, give the team shared customer tags, or agree measurable criteria for customer segments.
Before you begin: Check the organisation in the navigation menu. You can only see and label customers your account can access. Shared label maintenance requires label-write permission; metric rules require the organisation owner or an admin with that permission. Managers can maintain shared manual labels where permitted, but cannot configure metrics. Every role can create its own personal sets.
1. Understand the three levels
A label set is a collection, such as Company size. A category groups choices inside it, such as Employee count. A label value is the actual tag you apply to a customer, such as Small or Large. Creating the collection does not label customers.
- My labels: personal choices visible only to you. Example: Follow-up → Timing → Call this week.
- Organisation labels: shared choices for the team. They are manual unless you add a metric. Example: Interests → Product → Packaging.
- Measured organisation labels: the same shared choices, with one numeric metric per set. Atlas proposes a matching value; you review and confirm it. Use separate sets for employee count, revenue and sales.
- Industry and Classification sets: managed catalogues for industry, Customer type and Class. These are separate from ordinary tags; applying a measured label does not change those fields.
2. Create a personal label
- On Labels, scroll to My labels and select Create personal label set.
- Enter Follow-up in Name. The description is optional.
- Select Add another category and enter Timing.
- Select Add value and enter Call this week. Repeat Add value for another choice, such as Waiting for reply.
- Select Create label set. Find it under My labels, then follow Apply a label.
Expected result: Your set and its choices are saved for your use. Other team members cannot see your personal set. Personal sets do not support metric rules.

3. Create shared manual labels
- In Organisation labels, select Create label set. If this button is unavailable, ask a permitted administrator to create the shared choices.
- Enter a name, for example Company size, and a description explaining when the team should use it.
- Select Add another category, enter Employee count, then use Add value twice to create Small and Large.
- Select Create label set. The set appears in Organisation labels. It is now usable for manual tagging.
- For numeric suggestions, continue to Metric setup. Otherwise apply the choices from a customer profile.

4. Apply a manual label and find labelled customers
- Open Customers → Customers, then open the customer.
- In the customer header, select + Label (or the plus control beside existing labels). Expand the relevant Organisation labels or My labels group and find the set/category.
- Select a value. A checkmark and a chip on the customer show the saved selection. Changes save immediately; there is no separate Save button. Select it again to remove it, or use the chip's × control.
- Return to Labels. Select the customer-count button beside a set to open customers using that set. Clear the resulting filter to return to the full customer list.
The customer picker also offers + Create new label. That shortcut creates a set and applies its new values to the current customer on save. Use the Labels page when you want to define choices without applying them yet. Manually choosing a value is not a metric-evidence review; use Metrics & review when you need to check the number behind it.
5. Add a numeric metric to a shared set
- Create the shared set and its label values first. On its row, select Metrics & review, then Configure metric. For an existing metric, the button is Edit rules.
- Enter a clear Metric name. Choose one Data source using the examples below.
- Enter Unit / currency and Calendar year (UTC). Use employees for headcount or a currency code such as SGD for money. The year covers January 1 through December 31; money is entered in whole currency units, not cents.
- For each range, choose its Label, enter From (inclusive) and Below (exclusive), and use Add range for another label. A label may appear in only one range; ranges cannot overlap. Empty bounds mean no limit. Values and entered bounds must be nonnegative.
- Select Save rules. This saves the definition and opens customer review. It does not apply any labels.
Range example: Small: From 0, Below 100. Large: From 100, Below empty. A value of 99 matches Small; exactly 100 matches Large. These are illustrative thresholds, not Atlas defaults or a recommended business standard. Gaps between ranges are allowed and produce No matching range.

6. Example: label companies by employee count
- Create Company size → Employee count → Small and Large using step 3.
- Configure Metric name Employee count, Data source Business size, Unit employees, Year 2026, and the ranges in step 5. Save rules.
- Find a customer in Review customers. Select Record observation. Enter the company's employee count, for example 150, and a Source / evidence note identifying where the 2026 figure came from.
- Select Save observation. When the result shows Matches · Large, check the figure and source, then select Confirm label.

7. Example: label customers by paid sales with us
- Create a shared set Paid sales segment, category Annual paid sales, value High paid sales.
- Configure Metric name 2026 paid sales, Data source Paid sales to this customer, Unit / currency SGD, Year 2026.
- For this illustration, set High paid sales From 100000, leaving Below empty. Save rules.
- Review customers. Atlas totals recorded transactions marked Paid, in SGD, whose transaction date is in the selected UTC year. It excludes other statuses and currencies; it does not convert currencies or use the customer's own total revenue.
- Check the evidence and select Confirm label for a match. A total of 120000 SGD matches this example; 80000 gives No matching range. With no eligible transactions, the result is Insufficient evidence, not zero. Correct or add genuine transaction records in the customer's transaction area, then Refresh review; this source has no manual observation form.
8. Example: label companies by their own revenue
- Create a separate shared set Company revenue segment, category Annual revenue, value Revenue 10m+.
- Configure Metric name Company annual revenue, Data source Customer company revenue, Unit SGD, Year 2026. Set the example range From 10000000, Below empty, then Save rules.
- For each customer, select Record observation. Enter the numeric revenue in SGD, for example 12000000, and identify the annual report or company-provided source and its year in the source note. Do not enter “12m”.
- Save observation, inspect the match and evidence, then Confirm label. Atlas does not fetch annual reports, derive company revenue from your sales, or convert a USD figure into SGD. Use evidence compatible with the rule's unit and period.
9. Example: label companies by another number
- Create a shared set Factory footprint, category Factory count, value Multi-site.
- Configure Metric name Operating factories, Data source Other numeric metric, Unit factories, Year 2026. Use the illustrative range From 2, Below empty, and Save rules.
- Record observation 3 for a customer with a source note confirming three operating factories in the selected year. Save observation.
- Review the suggested Multi-site label and Confirm label. Use another set for another measure; this is one numeric measure per set, not a formula combining several measures.
10. Read and confirm the result
- Matches: check the measured value, unit, year, proposed label and evidence before selecting Confirm label.
- Insufficient evidence: record a sourced observation for non-sales metrics, or check eligible paid transactions for paid sales. An unknown value is not zero.
- No matching range: evidence exists but falls outside the configured ranges. Check the rules; no label is suggested.
- Already applied: the matching label is already present. You do not need to apply it again.
Use Load more customers when offered to continue through the list, and Refresh review after data changes. Only customers you are authorised to access appear. Confirmation adds the matching label; it never removes another label or changes Customer type or Class. A changed metric does not automatically reclassify existing customers.

11. Change rules, maintain catalogues, or resolve a problem
- Change a threshold: Metrics & review → Edit rules → Save rules. Then review again. In the current version, previously entered observations must be entered again for the new rule revision, even if only a threshold changed. Existing labels remain applied.
- Edit label names or add values to a measured set: first select Disable rules, then Confirm disable. Close the review and use the set's actions menu → Edit. Save the label choices, then configure the metric again. Disabling does not remove already applied labels.
- Rules or evidence changed: select Refresh review and recheck before confirming. Do not rely on an old suggestion.
- No Configure metric button: check that this is an ordinary organisation set and that you are the owner or a permitted admin. Personal sets and protected Industry do not support metrics. Add label values first if the set is empty.
- Search appears empty: clear Search label sets and check the organisation. Search filters set names, descriptions, category names and values; it is not a customer search.
- Industry: use the protected Industry section. Permitted maintainers select Edit to add, rename, reorder or hide values. The set itself cannot be deleted; hiding a value keeps it on existing customers. To request an industry, enter it under Proposed industries and select Propose; it remains unavailable until approved by an admin or manager.
- Customer type and Class: use Classification sets → Add value, Rename, reorder or Delete where permitted. These choices also affect pickers, filters and imports. The built-in Lost value cannot be deleted. This is catalogue maintenance, not creating a numeric segment.
Screenshots in this label guide were captured from the staging interface on 9 September 2026 (revision 7f449ec), using an existing synthetic review fixture. Creation and observation forms shown here were not submitted. Example thresholds are illustrative. The other sections on this page retain their own screenshot provenance.
Profiles can include main markets, brands and products, retained when switching customer drafts. Spreadsheet imports support these fields, website, background and primary-contact social accounts. Before committing, review unmapped columns, excluded worksheets and row-limit warnings. Blank cells preserve existing values.
The recycling and Public customer tutorial was checked in production on 25 October 2026 with fresh synthetic UAT customers: merged contact recency, manual release and rep claim were observed. The demonstration policy stayed inactive; a natural 67-day cycle was not observed. These new figures do not redate the other historical screenshots.
Study scope and screenshot provenance
Procedures verified on staging atlas.staging.forth.ai, 22 September 2026, web build 027732e (ref staging), signed in as an owner, an admin, a manager and two reps of one ordinary organisation. That walk was read-only: no decision was accepted, rejected or dismissed, no message was sent or retried, no record or setting was saved, and no paid agent run was started. Visibility differs by role and release settings; sections that need a platform-operator account say so and were not re-observed. Staging advanced from web build c848b7e to 027732e during the walk; the Today screenshots and every quoted Today wording come from 027732e, and the only difference between the two builds is on Today (singular overdue wording, a dropped tier label and a sort fix). Screenshots dated 2026-09-07 come from the earlier production study of atlas.forth.ai at web revision 0af15ad and are kept where the screen is unchanged; screenshots dated 2026-09-22 are staging. One sender address was masked. Destructive, financial and sending procedures are described from the deployed source and were not executed. The customer-creation sections above were additionally checked against live production web source 3d1fbb9 and staging source ef39dda8b on 21 October 2026; this source review did not include new browser screenshots or record creation.